By Colin B., published November 5, 2026, last reviewed November 5, 2026By Colin B., updated Nov 5, 2026We earn a commission if you buy through our links. How this works
Handmade cards are the craft where a $10 stamp set and a good ink pad get you something people actually keep. You can start for about $50 and add a die-cutting machine when you're hooked. Here's the order to buy things in, the paper weight that matters, and the gadgets that can wait.
00
The short version
Starter budget
$50 to $230
How hard
Easy to start
Day one
Order acrylic blocks, a sentiment stamp set and a black ink pad.
A $10 clear stamp set, an acrylic block and one good black ink pad make beautiful cards. Buy a die-cutting machine once you know you'll keep making cards, because the dies are where the real spending starts.
Buy heavy cardstock for card bases.
110 lb (about 300 gsm) cardstock folds crisply and stands up on a shelf. Thinner 80 to 90 lb paper is great for layers and die cuts on top, but flimsy as a base.
A manual die cutter and a Cricut are different tools.
A manual machine like the Big Shot presses metal dies through paper and also does embossing folders, with no software. A Cricut is an electronic cutter driven by an app. For classic card making, start manual.
02
Die-Cutting Machines
A manual die-cutting machine squeezes a metal die and your paper between plates, cutting clean shapes, frames and words in one crank. Most also emboss texture with folders. The 6 inch size fits nearly every card die. The Sizzix Big Shot is the long-running standard; the Spellbinders Platinum is heavier and cuts intricate dies in a single pass more reliably. Either way, budget for dies on top.
Two kinds of die-cutting machines, compared
Manual die cutter
Hand-cranked roller machine for metal dies and embossing folders. No software.
Price
$145-170
Power
Hand crank
Best for Classic stamped and layered cards Trade-off You buy each die shape separately
Best starter$169.29as of Nov 5, 2026★★★★★ our ratingIn Stock
Sizzix
Big Shot Starter Kit (6 Inch)
The machine most card makers start on, sold with exclusive dies, an embossing folder and cardstock so you can cut and emboss on day one. About $169, 4.7 stars from nearly 600 buyers.
Platinum Die Cutting and Embossing Machine (6 Inch)
A heavier machine with a universal plate system that cuts detailed dies cleanly in one pass, which matters once you buy intricate frames and words. About $150.
Clear photopolymer stamps cling to an acrylic block, so you can see exactly where you're stamping. You need a few block sizes and a sentiment set ("happy birthday", "thank you") to start, because sentiments go on nearly every card. A stamping platform like the MISTI holds the stamp in place so you can re-ink and stamp again for a crisp, solid image.
Best starter$9.99as of Nov 5, 2026★★★★★ our ratingIn Stock
Mudder
Acrylic Stamp Blocks Set with Grid Lines, 7 Pieces
Seven blocks in different sizes with grid lines for lining up stamps straight, for about $10. 1,900+ reviews. Every clear stamp needs one.
The stamping platform card makers swear by. It holds your paper and stamp in place so you can stamp, re-ink and stamp again in the exact same spot for a crisp, solid image. About $60, 4.8 stars.
One good black ink pad covers most cards. Dye inks dry fast and give crisp lines; some are made to work under alcohol markers and watercolor without smearing. Blending inks like Distress Oxide are for colorful backgrounds, sponged on with a blending tool. Start black, then add color.
Best starter$8.95as of Nov 5, 2026★★★★★ our ratingIn Stock
Tsukineko
Memento Dye Ink Pad, Tuxedo Black
The black ink card makers reach for: fast-drying, crisp, and safe under alcohol markers, so stamped images color cleanly without smearing. About $9 and 4.8 stars from 6,400+ buyers.
Twelve Distress Oxide colors for blending soft backgrounds, skies and gradients. They blend like dye ink and dry with a chalky finish. About $63, the fun one once you've got the basics.
Cardstock weight decides how professional a card feels. Use 110 lb (around 300 gsm) for card bases so they stand up, and lighter 80 to 90 lb for layers, stamped panels and die cuts. Bright white, smooth cardstock gives the crispest stamping and colors best.
Heat embossing makes raised, shiny stamped images. Stamp with clear embossing ink, pour on embossing powder, tap off the extra and melt it with a heat tool. It's the technique that makes a simple card look store-bought, and it's easier than it looks. A hair dryer won't work; it blows the powder away without melting it.
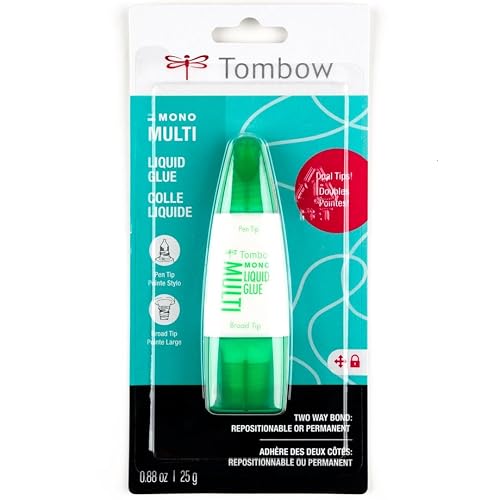
You need one liquid glue for precise layers and die cuts, and foam squares to pop panels up for dimension. That's it. Tape runners are handy too, but a good liquid glue does the job and lets you slide pieces into place before it grabs.
Best starter$7.99as of Nov 5, 2026★★★★★ our ratingIn Stock
Tombow
MONO Multi Liquid Glue
A dual-tip liquid glue with a fine tip for die cuts and a wide tip for panels. It dries clear, and you get a few seconds to nudge pieces into place. About $8, 6,500+ reviews.
Card making gets good fast if you make a lot of simple cards instead of a few complicated ones. Here's what your first ten cards should teach you, from the first fold to heat embossing.
Most beginners try to put everything on their first card. The ones who get good quickly do the opposite: one stamp, one sentiment, lots of white space, made over and over until it looks clean. Here’s a path through your first ten.
Cards 1 to 3: Base, stamp, sentiment
Cut a sheet of 110 lb cardstock to 5.5 by 8.5 inches, score it down the middle at 4.25 inches and fold it with a bone folder or the back of a spoon. That’s a standard A2 card that fits a standard envelope.
Now stamp:
Ink the stamp, not the pad. Tap the pad onto the stamp a few times so the ink coats evenly.
Press straight down, firmly, and lift straight up. Rocking the block smudges the edges.
Stamp on a scrap first. Every stamp behaves a little differently.
Stamp one image and one sentiment. Done. Make three, each with a slightly different layout, and you’ll see right away which looks best.
Stamp onto a smaller panel of white cardstock, about 4 by 5.25 inches, and glue it onto a colored card base, or onto a slightly bigger colored mat. That thin border of color is the single easiest way to make a card look finished.
Pop one panel up with foam squares for a shadow. Leave space around the image. White space is what makes a card look intentional rather than crowded.
Cards 7 and 8: Heat embossing
Stamp a sentiment with clear embossing ink, pour embossing powder over it, tap the extra back into the jar and heat it with a heat tool until it melts and goes shiny. It takes about ten seconds.
Tips that save frustration:
Rub the paper with an anti-static bag or a dryer sheet first, so powder doesn’t stick to fingerprints.
Heat from below the paper for a moment if it’s curling, then from above.
Gold and white embossing on colored cardstock is the classic first look.
If you’ve bought a die-cutting machine, start with simple dies: a circle, a rectangle frame or a word. Lay the die cut side down on cardstock, sandwich it in the plates the way your machine’s chart says, and crank it through. Glue the shape down with a liquid glue on a fine tip.
No machine yet? Fussy-cut a stamped image with small scissors and pop it up with foam. It’s the same idea, and plenty of experienced card makers still prefer it.
What not to worry about yet
Don’t chase every new stamp release. Don’t buy dies that don’t match stamps you already love. Make simple cards, send them to people, and notice which ones you’re proud of. That tells you what to buy next better than any haul video.
09
What you don't need yet
Beginners get pressured to buy a lot of stuff that doesn't help them.
Here's what we'd skip on day one.
A Cricut A great tool, but a different hobby. Classic stamped cards don't need electronic cutting.
Hundreds of dies Buy dies that match stamps you love. Random die bundles end up in a drawer.
A full Distress ink collection One black pad and a few colors are plenty until you know your style.
A hot foil system Beautiful results, but it's an add-on once you're making cards every week.
A paper trimmer with every blade A basic trimmer or a ruler and craft knife cuts card panels fine at first.
10
Your first seven days
A short, real plan to get from gear-on-doorstep to actually doing it.
Order acrylic blocks, a sentiment stamp set and a black ink pad.
Acrylic blocks, a sentiment stamp set, black ink, cardstock and glue get you making real cards for about $50. Adding a Big Shot starter kit with dies brings it to around $230, and that machine lasts for years.
12
Common questions
Do I need a die-cutting machine to make cards?
No. Stamps, ink, cardstock and glue make beautiful cards. A die-cutting machine adds clean shapes and embossed textures, and it's worth it once you know you'll keep going.
What's the difference between a Big Shot and a Cricut?
A Big Shot is a hand-cranked press that cuts with metal dies and embosses with folders, no software needed. A Cricut is an electronic cutter that cuts any design you choose in an app. Most stamp-based card makers start with a manual machine.
What weight cardstock should I use for cards?
About 110 lb (300 gsm) for card bases so they stand up, and 80 to 90 lb for layers, stamped panels and die cuts.
What ink is best for stamping?
Start with one good black dye ink like Memento Tuxedo Black. It stamps crisply, dries fast and doesn't smear under alcohol markers. Add colored and blending inks later.
How do I get crisp, solid stamped images?
Use even pressure, smooth cardstock and a well-inked stamp. A stamping platform like the MISTI helps most, because you can stamp the same spot twice without moving the stamp.
What size is a standard greeting card?
An A2 card is 4.25 x 5.5 inches, made from a 5.5 x 8.5 inch piece of cardstock folded in half. It fits standard A2 envelopes.
 Just Beginning