By Colin B., published November 5, 2026, last reviewed November 5, 2026By Colin B., updated Nov 5, 2026We earn a commission if you buy through our links. How this works
A worm bin turns your kitchen scraps into rich, dark castings that plants love, and it fits under a sink or in a closet without smelling. You need the right worms, damp bedding and a little patience. Here's the bin to start with, why garden earthworms won't work, and how much to feed them.
00
The short version
Starter budget
$45 to $180
How hard
Easy to start
Day one
Pick a spot that stays between about 55 and 80°F, out of direct sun.
Buy red wigglers, not nightcrawlers or garden worms.
Red wigglers (Eisenia fetida) live in the top few inches of rotting material and thrive in bins. Garden earthworms and bait-shop nightcrawlers burrow deep and die in a shallow bin. This is the most common beginner mistake.
Start small with food.
A new bin of worms eats slowly while it settles in. Feed a handful of scraps a couple of times a week for the first month, and only add more once the last batch is mostly gone. Overfeeding is what causes smells and fruit flies.
Plan where the bin will live.
Worms are happiest between about 55 and 80°F, out of direct sun. A kitchen, closet, basement or garage that doesn't freeze all work. Outside in summer heat or winter frost, they die.
02
Worm Bins
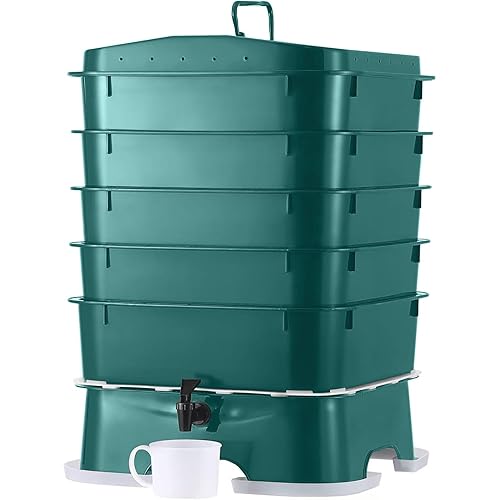
Stacking tray bins are the easiest: worms eat their way up into fresh food in the top tray, leaving finished castings in the trays below for you to harvest. Continuous-flow bags hang the castings at the bottom and let you pull them out from underneath. A DIY tote with holes drilled in it works too, and costs almost nothing, but harvesting is messier.
Two kinds of worm bins, compared
Stacking trays
Worms migrate up through trays toward fresh food. Harvest the bottom tray.
Harvest
Easy
Price
~$80
Best for Most beginners and kitchens Trade-off Trays can dry out or stick if bedding is too wet
Best starter$82.00as of Nov 5, 2026★★★★★ our ratingIn Stock
VermiHut
Plus 5-Tray Worm Composter
A compact five-tray stacking bin with a worm-saver tray, a moisture-holding lid insert and a coconut mat, for about $82. Worms move up as you add food, so harvesting castings means lifting off a tray. 1,900+ reviews.
A continuous-flow fabric bin on a stand. Feed the top, open the bottom and pull out finished castings with no tray juggling. The breathable fabric keeps it from going stinky. About $139.
Your worms are the engine. A pound of composting worms is roughly 1,000 worms, and it's a good amount to start a home bin. They breed fast, so a small start fills a bin in a few months. Worms ship alive and arrive stressed. Put them straight into damp bedding, leave the lid on with a light on nearby for a day or two, and don't feed much the first week.
Best starter$59.95as of Nov 5, 2026★★★★★ our ratingIn Stock
Uncle Jim's Worm Farm
1000 Count Red Wiggler Composting Worms Mix
About 1,000 composting worms for about $60, enough to get a new bin running properly from day one. Uncle Jim's has sold composting worms for decades, with 3,300+ reviews.
About an eighth of a pound of red wigglers for about $28, a cheaper way to start if you're patient. They'll multiply to fill the bin over a few months.
Bedding is the home worms live in and the carbon that balances wet food scraps. Coconut coir holds moisture well and has the right texture. Mix it with shredded newspaper or brown cardboard, and keep it as damp as a wrung-out sponge. Too wet and the bin smells; too dry and worms suffer.
Best starter$12.49as of Nov 5, 2026★★★★★ our ratingIn Stock
Urban Worm
Coco Coir Soil Amendment and Bedding
A rinsed, low-salt 1.4 lb coir brick that absorbs about a gallon of water and fluffs up into bedding. About $12. Low salt matters: salty coir can harm worms.
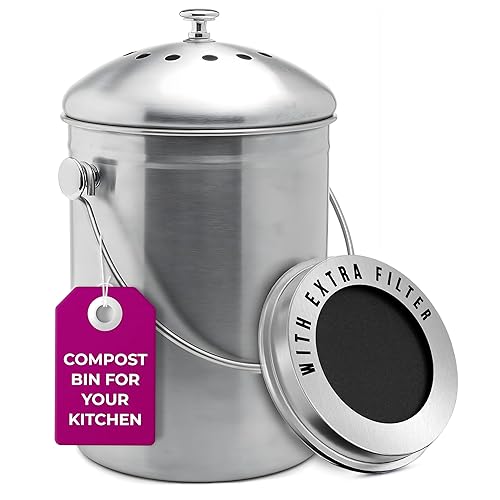
A countertop caddy collects scraps through the week so you feed the worms in one go. A charcoal filter in the lid keeps odors down. Chop or freeze scraps first and worms eat them much faster.
Best starter$24.69as of Nov 16, 2026★★★★★ our ratingIn Stock
Utopia Kitchen
Countertop Compost Bin, 1.3 Gallon
A stainless steel 1.3 gallon caddy with a charcoal filter lid for about $25. It holds a week of scraps for most households and looks fine on a counter. 20,000+ reviews.
A similar stainless caddy with an airtight lid and replaceable charcoal filter for about $30, with 21,000+ reviews. Pick whichever matches your kitchen.
A worm bin is easy once it settles in, and the first few weeks decide whether it thrives. Here's what to expect month by month, from setup and slow early feeding to your first harvest of castings.
Worm composting has one golden rule: go slow at the start. New bins fail from too much kindness, mostly too much food. Get through the first month gently and the worms will handle your kitchen scraps for years with almost no effort.
Before the worms arrive: Set up the bedding
Soak a coir brick in a bucket of water until it breaks apart, then mix it with shredded newspaper or plain brown cardboard. Squeeze a handful. It should feel like a wrung-out sponge, with a drop or two of water, not a stream.
Fill the bottom tray (or your tote) a few inches deep, add a handful of soil or a little finished compost to introduce helpful microbes, and bury a small amount of chopped scraps. Let it sit a few days before the worms arrive.
Worms ship alive in a bag and arrive stressed. Gently spread them on top of the bedding and leave the lid on. A light on in the room for the first night or two keeps them from wandering, because worms avoid light.
Feed very little in the first month:
A small handful of scraps, once or twice a week.
Chop or freeze scraps first. Freezing breaks cell walls, so worms eat it far faster.
Bury food under the bedding, never on top. That stops fruit flies and smells.
Check before each feeding. If the last scraps are still there, wait.
Month 2: Find the rhythm
By now the worms are eating noticeably faster. You can feed more often, building up slowly. You’ll learn your bin’s signals:
Sour smell or too wet? Feed less and add dry shredded cardboard.
Dry and crumbly? Spray a little water.
Worms crowding the lid? Usually too wet or too acidic. Add cardboard and a little crushed eggshell.
In a tray bin, once the bottom tray is mostly dark, crumbly castings, add a fresh tray of bedding and food on top. Over a few weeks, the worms move up, and the bottom tray is yours to harvest. In a bag system, open the bottom and pull out finished castings.
Mix castings into potting soil, top-dress houseplants or work them into garden beds. A little goes a long way.
What not to worry about yet
Don’t buy meters or supplements. Don’t panic over a few worms on the lid or a handful of fruit flies; both are fixable in days. Feed less than you think, keep the bedding damp and dark, and let the worms do the work.
07
What you don't need yet
Beginners get pressured to buy a lot of stuff that doesn't help them.
Here's what we'd skip on day one.
A worm thermometer or pH meter Squeeze the bedding and smell it. If it's damp, earthy and not sour, it's fine.
Worm food supplements Kitchen scraps and bedding are all they need. A little crushed eggshell helps with grit.
An outdoor compost tumbler Hot composting is a different system. Worms do the job in a small bin indoors.
Several bins One bin handles most households. Split it once the worms multiply.
Worm tea brewers Brewing worm tea is a fun extra later. Castings mixed into soil work great on their own.
08
Your first seven days
A short, real plan to get from gear-on-doorstep to actually doing it.
Pick a spot that stays between about 55 and 80°F, out of direct sun.
Add the worms, then feed only a small handful of chopped scraps in the first week.
09
What it costs
Budget start
$45
Typical
$180
A storage tote you already own, a coir brick and a small pack of red wigglers gets you going for about $45. A tray system, 1,000 worms, bedding and a kitchen caddy comes to around $180, and the worms multiply so you only buy them once.
10
Common questions
Do worm bins smell?
A healthy bin smells like damp earth. Bad smells mean too much food, too much moisture, or the wrong food like meat or dairy. Feed less, add dry shredded cardboard and the smell goes within days.
Can I use worms from my garden?
No. Garden earthworms and nightcrawlers burrow deep and don't survive in a bin. Composting needs surface-dwelling worms like red wigglers.
What can I feed composting worms?
Fruit and vegetable scraps, coffee grounds, tea bags, crushed eggshells and plain paper. Skip meat, dairy, oil and salty food, and go easy on citrus and onions.
How much do worms eat?
An established bin can eat roughly half its weight in food a day, but new worms eat far less. Start small, and add food only when the last batch is mostly gone.
How long until I can harvest castings?
Usually three to six months for the first harvest, depending on how many worms you start with and how warm the bin is. After that, a tray system gives you castings every month or two.
How do I get rid of fruit flies in a worm bin?
Bury food under the bedding instead of leaving it on top, cover the surface with dry shredded paper, and feed less. Freezing scraps before feeding kills fly eggs.
 Just Beginning